Soft Tissue Release Techniques
This article will demonstrate some simple soft tissue release techniques you can do yourself, along with focused stretches for commonly tight musculature.
Common postural traits are evident in virtually every gym and massage therapy clinic worldwide. This faulty posture, known as upper and lower cross syndrome, can affect strength, stability performance and negatively impact on our ability to
incorporate ideal form during key movement patterns.
I’ll also share some simple but hugely effective gluteal and scapula retractor activation exercises Foam rolling and Active Isolated Stretching (AIS) are my personal techniques of choice. No fancy equipment is needed and both techniques are relatively easy to incorporate into your warm-up or to do on rest days in front of your television.
Foam rolling is a great soft tissue release techniques to reduce muscle density and deactivate troublesome trigger points that cause muscle shortening and diminish strength and cause pain.
The soft tissue release techniques I suggest is to foam roll and stretch so that you get the most bang for your buck when it comes to lengthening common tight muscles. I have tried to include straightforward techniques that don’t require awkward body positioning and time consuming set-ups.
The entire soft tissue release foam rolling, AIS stretching and activation routine should take approximately 20 minutes.
The Rules
Foam Rolling
-
When rolling long muscles, you should roll in sections, always starting closest to the body. For example, when you roll your quads, begin with the mid thigh to hip, then move on to the knee area to mid thigh.
- Complete 4-6 strokes over each section or muscle. If an active trigger point is located, maintain pressure on that area until the discomfort felt reduces by 50%.
- If the discomfort does not reduce by 50% after 15 seconds move off the area and then revisit it applying slightly less pressure.
Active Isolated Stretching
- Hold each stretch for a maximum of 2 seconds.
- Use reciprocal inhibition to accentuate the stretch response. For example, tighten your quads to improve a
hamstring stretch (this works by relaxing the hamstring). You can further improve the stretch with the use of a rope or band.
- Stretching should not be painful; you should experience mild discomfort at worst.
Activation
- Perform between 6-8 repetitions. The idea here is to activate commonly weak muscles without inducing any muscle fatigue.
- Perform each exercise at a moderate pace and incorporate a 3 second isometric hold at the end of each movement.
- Always perform activation work after you stretch your
tight areas.
If this approach to pre-habiliation (injury prevention) is
met with resistance, you can break the routine up into mini
pre-habilitaton routines. For example:
| Monday | Tuesday | Wednesday | Thursday | Friday | Saturday | Sunday |
| Quadriceps , TFL and Thoracic Spine Activator- Bird Dog |
Pectorals, an latissimus dorsi gastro-soleus
Activator- Band Pull aparts |
Adductors and External Hip Rotators Activator- Bird Dog |
Quadriceps , TFL and Thoracic Spine Activator- Bird Dog |
Pectorals, Latissimus dorsi and gastro-soleus Activator- Band Pull aparts |
Adductors and External Hip Rotators Activator- Bird Dog |
Optional
|
How it can be done
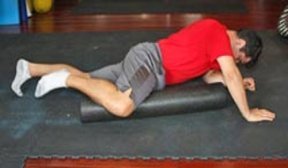
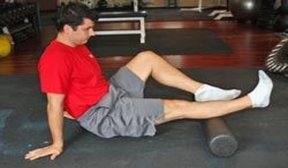
Quadriceps
Start with the roller approximately 5 inches down from your
hip bones and complete short back and forth rolling motions.
Roll the entire length of the anterior leg (this may have to
be done in several sections). Caution is needed at the knee;
you DON’T want to compress the knee cap.
|
|
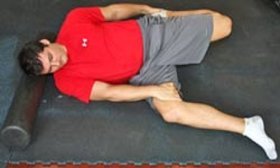 |
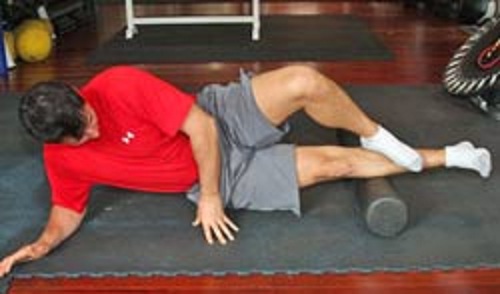
To perform the soft tissue release stretch, lying on your side grasp the front of the opposite foot. Tense your glutes and hamstrings, and pull gently on your foot to elicit a stretch in the anterior thigh.
Tensor Fascia Lata (TFL)
This muscle is commonly fibrosed and loaded with trigger points especially with people who have tight external hip rotators and weak psoas.
The TFL is not a big muscle and it’s located far more anteriorly than people think. To ensure you are rolling the correct area put your finger on the anterior iliac spine and move down and outward 1.5 inches now rotate your thigh internal and external you should feel a muscle contracting and relaxing, that’s your TFL
You should use short back and forth motion to perform the soft tissue release this muscle. I tend only to foam roll the actual muscular part of this area. I feel there are no major benefits from rolling the entire length of the Iliotibial band (IT band) as is not a contractile structure and its very commonly adhered of compressed against the vastus lateralis and or the bicep femoris and rolling can compound this problem
| Figure 2a: Foam rolling TFL
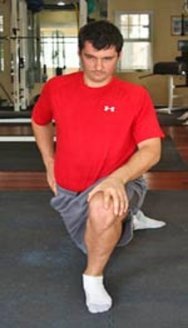
The TFL a really tricky muscle to stretch by yourself, so here is a soft tissue release technique I personally developed to open up the anterior hip (called the PC stretch). The key to stretching the TFL in this position is the initial set up. Notice how the rear leg (the leg being stretched) is adducted and externally rotated. You then lunge forward trying to keep the hips square. Ensure that you tense the glute max on the rear leg to initiate the lunge motion. |
Figure 2b: Stretching anterior hip
with TFL emphasis
|
Adductors
I roll the adductors in 2-3 sections, starting around the mid thigh and moving upward toward the groin. Fibrosis is generally located in the bottom third of the adductors (this is where the adductor hiatus and the adductor membrane are located).
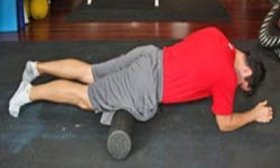
| Figure 3a: Foam rolling adductors
|
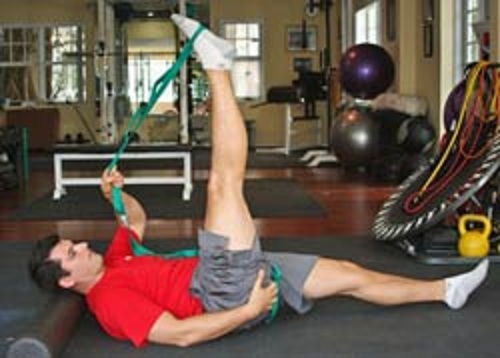
Figure 3b: Stretching
adductors
|
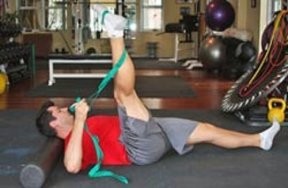
For the soft tissue release stretch, lie on your back with the knee fully extended. Use a rope around the foot to help produce a stretch and to create internal rotation, or in simple terms, toes turned inward. Use your quadriceps and hip flexors during the movement. Aim to lift the leg so your foot is approximately 8-12 inches away from your shoulder. This stretch is has emphasis on the upper region of the long adductor group.
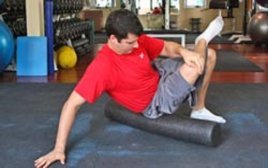
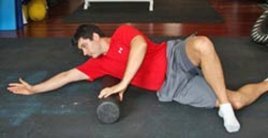
Hip External Rotators
If you have well developed gluteal muscles you may need to use a tennis ball or small medicine ball instead of the foam roller to achieve an effective release of the external rotators.
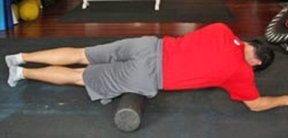
| Figure 4a: Foam rolling external hip rotators
|
Cross the leg that is being worked over to help to expose the rotators more. Perform short medial and lateral movements over the ball or roller. Ensure that you work from the lateral side of the sacrum towards the greater trochanter (hip bone). |
Lying prone with knees together squeeze your ankle together for 2 seconds then internally rotate then legs to stretch the external rotators
Figure 4b and 4c: Stretching the external rotators
| Step 1
|
Step 2
|
Pectorals
Use small diagonal movements. This will help to create length in the pectoralis minor. Since this muscle is short in length it can be worked fully in one movement.
| Figure 5a: Foam rolling
pectorals
|
Figure 5b: Stretching
pectorals
|
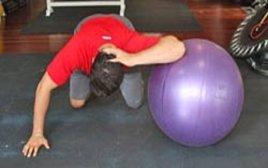
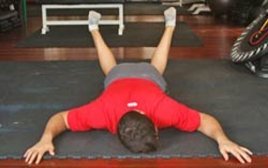
For the stretch, using a gym ball or plyo box, place the elbow so it is positioned just higher than the torso. Drop your chest down and back slightly whilst simultaneously tensing the posterior deltoid and scapula retractors to increase the stretch on the pectorals.
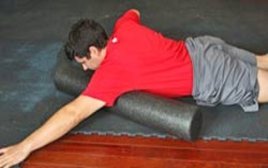
Latissimus Dorsi
Place the roller directly in the crux of the armpit. Perform short strokes, approximately 3 inches in length, and then continue to roll the lower aspect of the latissimus just past the lower part of the shoulder blade. You may need to rotate the torso slightly in order to compress the bulk of the tissue.
| Figure 6a: Foam rolling
lats
I prefer to perform latissimus stretches in a standing split stance. I feel that this helps to lengthen the lower part of this muscle in and around the thoracalumbar fascia area and it’s a great way of getting an extra little quadratus lumborum stretch. |
Figure 6b: Stretching
latissimus dorsi
|

Gastrocnemius, Solueus and Peroneals
Ankle range of motion is of huge importance and deficits here can cause a whole myriad of problems including quad dominance, poor squat and deadlift movement patterns to name just a few.
Start rolling the calves from the mid calf to just below the knee. You will need to roll the outer and medial head to ensure maximal release. To affect the soleus you will need to apply more pressure as this muscle is very broad and flat (again ensure that you cover the lateral and medial borders).
Next, start in the middle of the outside of the tibia, directly on the bulk of the peroneals. Roll to just below the knee joint and then release the lower end of peroneals, finishing just above the lateral malleolus.
| Figure 7a: Foam rolling
gastrocnemius
|
Figure 7b: Foam rolling
peroneals
|
For the stretch, lying supine place a rope or band over the ball of the foot and pull directly downward to get a broad stretch. Turn the foot slightly inward to place large emphasis on the lateral aspect of the gastrocnemius and peroneals.
Figure 7c and 7d: Stretching gastrocnemius
| Step 1
|
Step 2
|

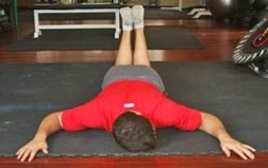
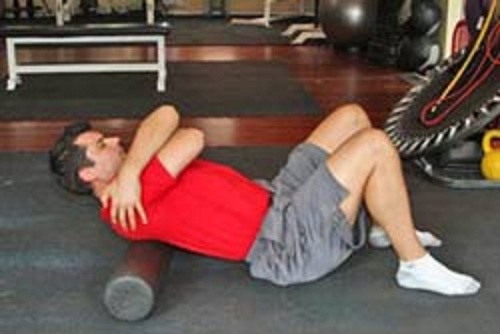
Thoracic spine
Thoracic spine mobility is key for maintaining healthy shoulders and ensuring ideal form during many CrossFit lifts. Many CrossFitters lose the ability to reverse their thoracic curve, therefore incurring shoulder impingement type pain and discomfort. This lack of mobility predisposes you to the dreaded upper crossed syndrome.
| Figure 8a: Foam rolling thoracic spine
|
Place the foam roll or tennis ball at thoracic vertebrae 12, approximately just below were a bra would be (if you wear one!). Extend over the roller or tennis balls using a mini crunch type movement. Perform 2-3 mini crunches at each segmental level, and then move down slightly (approximately 1 inch). Repeat this soft tissue release techniques until you reach the top of the thoracic spine, around the top of the shoulder blades. |
Muscle activation
Now that you have stretched out those tight facilitated muscles and increased mobility of the main trouble spots, you need to activate the commonly inhibited areas.
The two simple exercises I recommend are: band pull aparts
and Birddogs
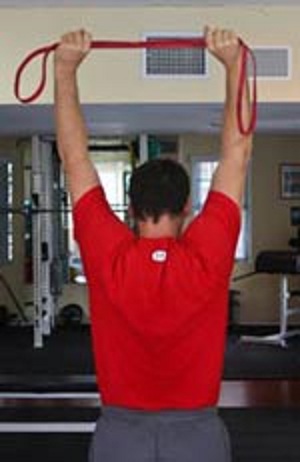
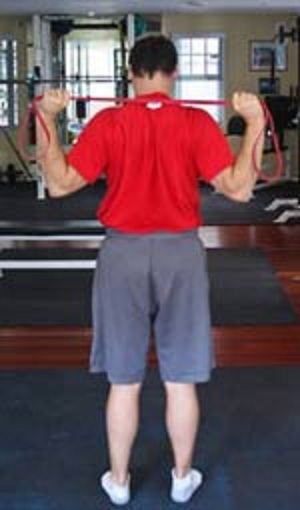
Band pull aparts
Band pull aparts is a simple soft tissue release exercise that increases muscular recruitment of the mid and lower traps and the scapula retractors.
Figure 9a and 9b: Band pull aparts
Holding a band at shoulder width, begin the pull down movement whilst pulling your hands apart to activate to required areas.
Once in position, step 2 hold for 3 seconds
| Step 1
|
Step 2
|
Bird Dogs
This exercise has numerous athletic enhancement qualities. Our intention with this soft tissue release exercise is to activate the gluteus maximus and shoulder stabilizers.
| Figure 10a: Bird Dog
|
Note the full extension of opposite arm and leg which will help fully activate the glute and shoulder stabilizers. Hold this position for 3 seconds. |

So there you have several basic self-help soft tissue release techniques incorporating foam rolling, active isolated stretching and muscle activation exercises. This simple routine will help prevent injuries and minimize current muscular aches and pain. Invest just 20 bucks in equipment and 20 or so minutes of your time several times a week to help maximize energize yourself and your training.